Jenkins: Build inside MSYS2
There are plenty of guides (and the official Jenkins documentation) regarding setting up a Windows build agent for Jenkins. However, one might find him or herself in a situation where binaries need to be built on Windows but still inside of a Unix environment (MSYS2 in this case). I could barely find any information regarding this setup on the internet and the few pieces I managed to find turned out to be very old/outdated.
In this blog post I’m going to outline how to setup a Windows 10 build agent for Jenkins that builds everything inside MSYS2.
TL;DR: The trick is to not use Jenkin’s build agent Java webapp (jenkins-agent.jnlp) but instead to run the agent.jar directly within MSYS2.
Prerequisites
The following requirements are expected to be fulfilled:
- Already running & configured Jenkins installation (this will be the master node).
- Already running & updated Windows 10 machine (can be a physical host, VM, …) with MSYS2 and necessary build tools installed.
Node setup
The first step is to add the new Windows 10 machine as a build agent to Jenkins.
Master node
Log into the web UI of the existing Jenkins (master) instance. Then navigate to Manage Jenkins > Manage Nodes and Clouds. Click New Node. Give the node a name, eg. Windows 10. Mark it as a Permanent Agent unless you have reasons not to do so. Click OK. The web UI should now present you with the configuration dialog for the newly added node. Perform the following configuration:
- Set
Remote root directoryto wherever you want all the Jenkins files to be placed on the build agent. For example, set it toC:/jenkins. The directory will be created automatically when starting the build agent. - Set
Launch methodtoLaunch agent by connecting it to the master. - In the
Launch method, check theUse WebSocketcheckbox. - Add an environment variable with name
PATHand value/mingw64/bin:$PATH(for MinGW64 builds)
Save the settings.
The nodes overview should now list the newly added node with the remark that it’s currently disconnected/offline:

Windows 10 node
The next step is to connect the Windows 10 node to the master. Before we can do this, download & install Java as a regular Windows application.
It’s important that you install Java as a regular Windows application - not within the MSYS2 environment.
On the Windows 10 machine, open a web browser, navigate to your CI instance (eg. https://ci.example.com) and log in with your admin account. Navigate to Manage Jenkins > Manage Nodes and Clouds. Click on the newly added Windows 10 node entry. You will be presented with information on how to connect the node to the master:
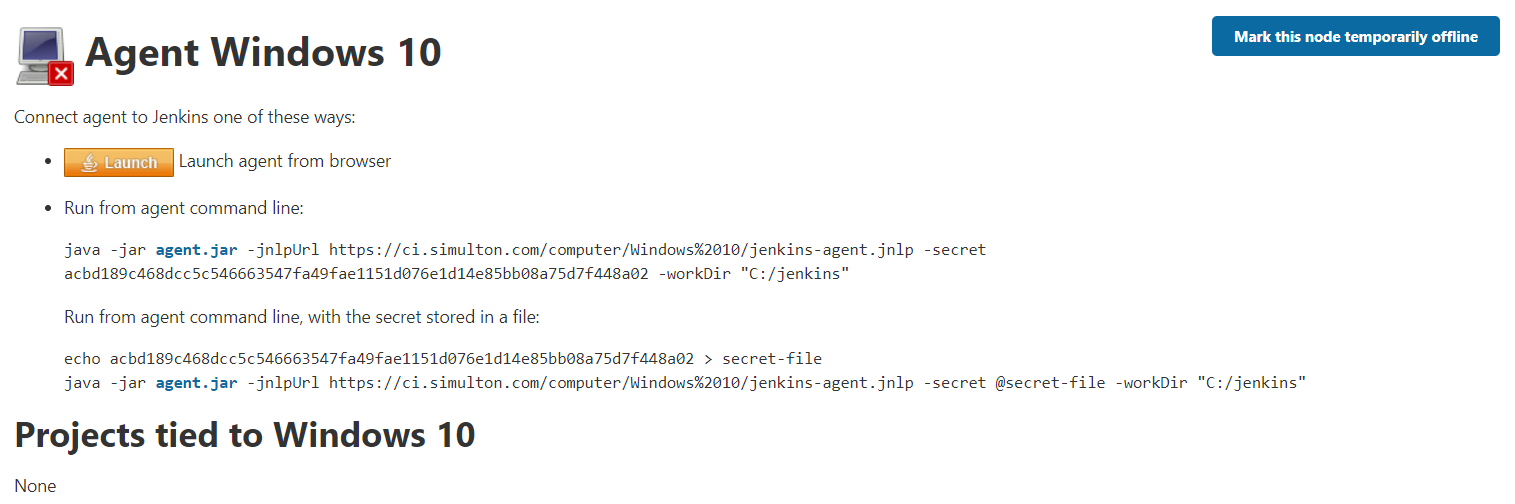
Here, click on the agent.jar link in the code snippets of the second bullet point. This will download the agent.jar file. Save it to where you’d like to have it.
Now it’s time to start the actual agent and this is where things get interesting: All we have to do is to launch the agent JAR within MSYS2 instead of within the regular Windows environment. At this point it’s vital to make sure that we launch the Java app inside of the actual MinGW64 (or MinGW32) terminal/shell - not within the “agnostic” MSYS2 terminal/shell.
After opening the MinGW64 (or MinGW32) shell by running C:/msys64/mingw64.exe, run the agent JAR:
/c/Program\ Files\ \(x86\)/Java/jre1.8.0_271/bin/java.exe -jar agent.jar \
    -jnlpUrl https://ci.example.com/computer/Windows%2010/jenkins-agent.jnlp \
    -secret 95bbdc15bfb65134d3bd7ef6bd003b90008f46c53823da7c62e366829e02bc43 \
    -workDir "C:/jenkins"
Things to note:
- Replace the path to the java binary (
java.exe) with the path matching your system setup. - Replace the path to the
agent.jarwith the path matching your system setup. - Replace the URL (
https://ci.example.com) with the URL pointing to your Jenkins master instance. Don’t forget to change the build agent node name as well (if you chose anything other thanWindows 10). - Replace the secret with the secret shown in the node overview of the Jenkins master instance (don’t bother attempting anything fishy with the secret shown here - I’ve randomly generated one).
- Replace the working directory (
-workDir) parameter with the working directory set earlier in the Jenkins node configuration UI.
It’s important to launch Java inside the MSYS2 environment. Make sure that this happens in the MinGW64 (or MinGW32) shell instead of the “agnostic” MSYS2 shell.
INFO: Connected.
We can further verify that connecting the build agent succeeded by going back to the Jenkins nodes list. The Windows 10 node should now show up as connected:

Pipeline setup
This section assumes that there’s an already existing Jenkins pipeline job to build some C++ code using cmake & make and that the code can build successfully in a MSYS2 environment.
The following is a very simple, inflexible, minimum Jenkinsfile that forces builds to take place on the Windows 10 build agent.
pipeline {
    agent { label 'Windows 10' }

    stages {
        stage('Run cmake')
        {
            steps
            {
                dir('build') {
                    sh "rm -rf *"
                    sh "cmake -G'MSYS Makefiles' .."
                }
            }
        }

        stage('Build')
        {
            steps
            {
                dir('build') {
                    sh 'make -j4'
                }
            }
        }
    }
}
This build should now complete successfully. Check the console output of the job.
Conclusion
That’s it! You should now have a working Windows 10 Jenkins agent that can build within MSYS2. Comment down below whether this worked for you or whether some extra steps/modifications were needed.